Wednesday, November 15, 2023

Christmas ornament card

Hi friends,

Today I have a Christmas card to show you. It’s about time to start producing them if I want to get ready in time to ship out this years Christmas cards. 

I have used Elliana Ornament from Memory box cut it out in sparkly red cardstock and a silver glitter sheet with holographic sparkles in it, slightly offsetting the layers  when glued on top of my Drop Ornament backdrop die in smooth solid red cardstock. I also cut out the ornament top in the same silver glitter paper and glued and added a silver ribbon as to hang my ornament on.

The pine sprigs are cut out of green cardstock. I also decided to cut out one from the silver glitter paper and snipped it into two pieces to pull in more Christmas bling to my card. 
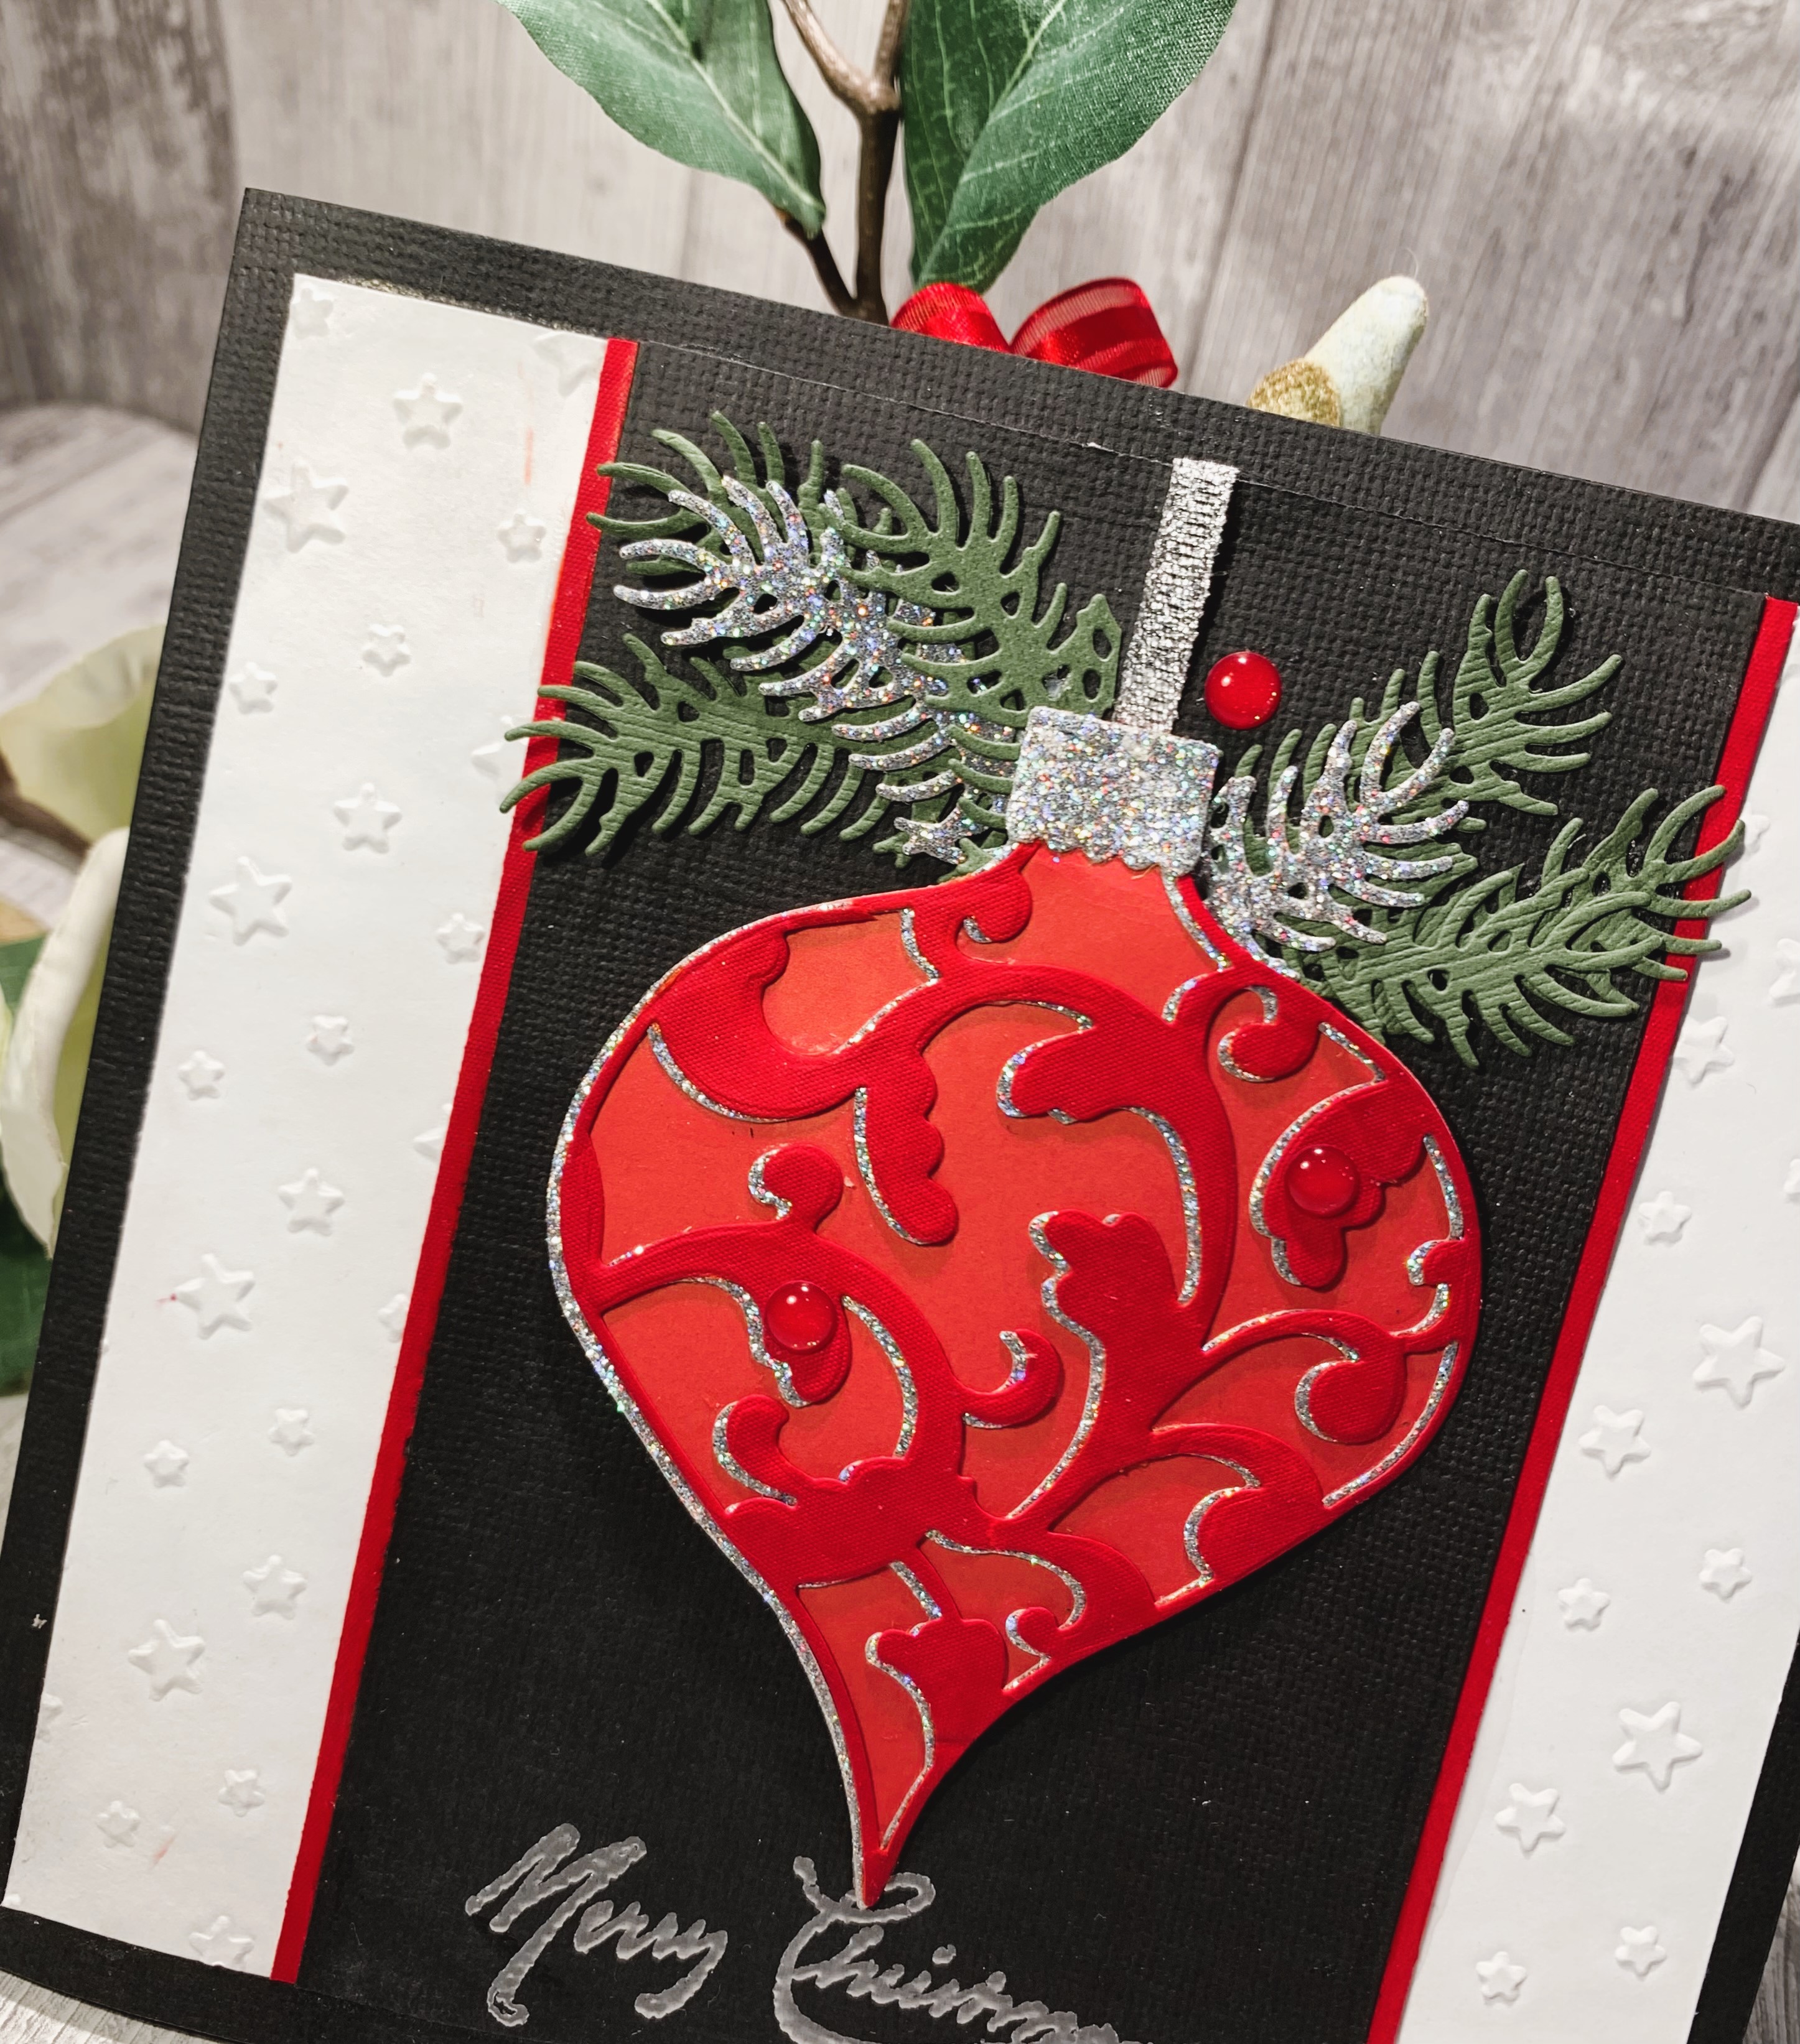


I framed the sides of the black panel with a thin strip from the same sparkly red cardstock. The white starry panels are embossed using Simon Says Stamp Rainbow Splash Embossing Folder Twinkling Stars, misting my paper slightly before running it through my Big Shot. I stamped and embossed my sentiment in silver embossing powder. Not perfectly stamped- again. Using textured cardstock sure doesn`t help. Maybe I really should push my wish for a stamping platform up on my Christmas list 😅


On the inside I stamped and embossed in silver a sweet Christmas text in norwegian from Kort og Godt   (M-232). Google translates it into someting like: 
"Thou star over Bethlehem
send thy rays down
and remind us that the commandments 
of Christmas 
are love and peace"
The text is actually the 3. verse of a Christmas hymn from Sweden. In Norway a more loosely translated version of the song is most popular. 
This is one of mye favorite songs around Christmas. Here is a link if you want to listen


Some red glitter sprinkles from Doodlebug and a red envelope, and my first Christmas card for this season is done.


I`m entering this card to:

Crafty Catz: Crafty Catz #658 -Make it Sparkle     (craftycatzweeklychallenge.blogspot.com)     2.nd entry

Wohoo! So happy to be among top 3!  Crafty Catz: Crafty Catz #659 Anything Goes (craftycatzweeklychallenge.blogspot.com)

Stamping Sensations: November challenge

Peace On Earth Christmas : Peace On Earth Challenge #51

Facebook Korthobbys inspirasjonsgruppe November utfordring- advent eller jul 


Thank you so much for stopping by, I hope you got inspired to create yourself a happy day crafting too. 

Hugs,

-Christine 💮

Monday, November 13, 2023

Another Dream Catcher Card

 Hi,

I`m back with another dream catcher card. This time I made an A2 size card in blue and white, and I`m so happy with how this card turned out. 

I am still trying to use up some of the papers I`ve been hoarding and I think this starry night paper was perfect for this card. To darken the edges and draw the eye to the center of the card, I used Distress ink in Faded Jeans and then Black soot being careful not to go in as far as I did with the dark blue ink. 


The dream catcher die and the feathers from Marianne design is cut out of smooth white cardstock, the same as my card base. I added some white feathers together with the die cuts and I love how it looks. The sentiment is embossed with silver embossing powder to pick up the little silver touch from the silver pearl treaded into my bow. I also added some white flat back pearls at the end of the sentiment banner and in a couple of stars on the background. The beautiful blue sprinkles with glitter are from Doodlebug.


And here is another look at the card. 


I like to enter this to:

Simon Says: Thinking Of You | (simonsaysstampblog.com) 2.nd entry

The Male Room: Challenge 180 - Feathers (themaleroomchallengeblog.blogspot.com) 2.nd entry

WOHOO I WAS THE LUCKY WINNER The Male Room: Winners #180 - Feathers (themaleroomchallengeblog.blogspot.com)


Crafty Catz: Crafty Catz #658 -Make it Sparkle (craftycatzweeklychallenge.blogspot.com)


I hope this dream catcher card inspired you to get crafty and create yourself a happy day crafting too. I sure had fun today.


Hugs,

Christine💮


Friday, November 10, 2023

Dream Catcher card

 Hi,

Today I`m back with a quick post to share my latest card with you. I made a dream catcher card using an older die from Marianne design. I colored a panel using Dylusions orange and yellow paint applying it with a baby whipe. Then I cut out my feathers trying to get a two tone effect on them to add some more interest.


The text is actually a stamp from Visible image that I love to use. This time the stamping was too light and since I don`t have a stamping platform I decided to just write over with a pen. I really, really want to invest in a stampingplatform, however, when I`m ordering there is always so much fun stuff I really, really want so I`ll have to wait for that one and just embrace the imperfections in the meantime. I darkened my edges with Distress ink in black soot, and I also went around my dream catcher with this to make it stand out more from the background. 


I added some string and pearls to my dream catcher and also used some old Prima bling from my stash.


I like to enter this to:

The Male Room: Challenge 180 - Feathers (themaleroomchallengeblog.blogspot.com)


Simon Says: Thinking Of You | (simonsaysstampblog.com)


I really like how this turned out in the end, and I hope you got inspired to create yourself a happy day crafting too.


Hugs,

-Christine💮

Wednesday, November 1, 2023

Make a beautiful card gift set and a matching birthday shaker card

 Hi,

Today I can finally show you this beautiful card set you can easily recreate with your pattern paper and make your own card gift set. I`m planning to make some Christmas card gift set as well. Perfect as a pre Christmas gift or as a host gift so they have cards to send out this season. But lets get back to this all year around card gift set. 

Since I made this to go along with a birthday gift I made a matching shaker birthday card.

I`ve had this sweet paper pack in my stash forever and this was the perfect opportunity to cut into them. I love the colors and the design, perfect for these types of cards.  I used a circle die and popped up the panel on foam tape. I glued down some purple pearls since I know the recipiant likes this color, and I also glued down a few of the sparkly shaker elements so there still is some interest when you hold the card upright. I added some sparkly twine around the card panel before gluing it down to my A2 card base. 


Here are the cards I made as a gift set using the same pattern paper pack. For this one I used a boarder die from La la land craft and added the # with congratulation on Norwegian. If you don`t have boarder die, you can use a border punch and get the same lovely layered effect.


On this card I went for a similar design but covering more of the card with pattern paper and I added the same sparkly twine and some bling instead of a sentiment making it very versatile and neutral..


Here I used a striped pattern paper from the same paper pack adding a birthday sentiment and popping the panel on foam tape for dimension. I added some bling across from corner to corner and I think this is another versatlie card suitable for masculine and female birthdays.


I loved that this paper pack also had some papers with craft color. This is another simple jet pretty design cutting the paper pattern at a diagonal angle. To pull in the black and also finish of the pattern paper i added a thin black stripe before I used another #birthday sentiment. I felt something was missing, so I decided to add another thin strip of the same pattern paper and I really love how this card turned out.


Another simple design letting the paper be the main focus on the card, just stamping the bold sentiment that translates into " Hello, my dear friend". I used glossy accent on the bird to make it pop, but its hard to catch on the photo.


To keep my card set together I simply cut out a strip of the pattern paper and glued on a circle for decoration and to keep the band closed. I used clear cellophane envelopes that are very nice to use if you hand out the card in person. The recipient can always just put the card in an envelope for shipping.  


I am really enjoying creating these A2 card size cards, but getting the perfect A2 size envelopes here in Norway has proven to be a challenge. If you know where I can get some in Norway please leave me a comment. 💖


I`m entering this to:

So excited to be among the Top 3 with my shaker card. Wohoo!

Thank you so much for stopping by, I hope you got some ideas and got inspired to create yourself a happy day crafting too.

Hugs,
-Christine💮

Friday, October 27, 2023

Sweet Li`l Grimmy

 Hi and welcome,

Today I have a Copic colored card to share with you, and it`s actually another Halloween card. So for this card I created a scene using two digistamps from Sweet November stamps. Li`l Grimmy sweet as my focal point and a background scene. Isn`t this just the sweetest little grimmy ever. 


Since I wanted my colored image to be the star of my card, I decided to ink up just the very edge with black soot distress ink just to give my colored panel a little pop. On my black cardstock I used an old Martha Stewart edge punch on one side that kind of can give a gothic vibe just to add some interest and life to my card. I glued it on an A2 white card base and anned som flat back pearls as my embellishment.


I used lots of colors on this one, and for his eyes and rope the colores are inspired from Amy at Sweet November stamp. Love this color pop insted of black on him.

Copic colores used: 

Skull: E41-42-43, W0
Eyes: RV63, BV04, V06-09 C5-7-9, 100
Outfit: BV04-08-13-17
Scythe: C0-1-3-5 E74-77-79

Background: 
Stair: C3- T3-5-7
Bushes and grass: YG61-63 G94-99
Sky: BV000-02-08-11-13 ( I belive.... )
Moon: W0-1-3, Y00-11, 0 (blender) I also added some on his scythe

I added clear Wink of Stella to my moon and I love how my sky and moon turned out. I also added some on his scythe as if the moonlight reflected on it.
I added white highlights in his eyes with a white Sharpie marker, and also added some highlight here and there with my white Sakura gelpen.


I like to enter this to: 
(3) Facebook  (Copic Norge #146 Anything goes)


I think this turned out so cute and I had such fun coloring this image. I hope you like it too, and that you got ispired to create yourself a happy day crafting too. 

-Christine💮


Monday, October 23, 2023

Alohomora - a Halloween inspired card

 Hi,

Today I have enjoyed some Copic coloring and I have colored up this cute image from My Besties that was one of the prices I got to pick on my July winner card. I don`t know what this image is called or where you can find it in the store, but I left a link to the page where the stamp is displayed so you can take a look if you want to. I colored her up inspired by Hermine Granger from Harry Potter, and turned the card into a magic witch themed Halloween card. I think this card may turned out more cute than spooky, what do you think?

I used an older collection from Graphic45 called "An Eerie Tail" and the colors and the designs on this paper is just soo pretty. I know you still can get stickers, chipboard and single papers from this collection in Norway at least, like at Bikuben hobby.


Copic colors I used :

Skin: E000-00-04-11-21, R20, RV11

Eyes: E09, YR23-24, Y21

Hair: E29-97, YR14-15

Outfit: T1-3-5

           orange/red: E07, R24-29, YR04-18

            W1-3-5-7

Wand: E41-42-44-47

I actually got a big blob from one of the darker grey markers on her outfit, but I think I was able to fix it pretty good and I don`t think its that obvious. Don`t you just hate when that happens. To give her eyes more glow I used a black pen to deepen the dark and a white Sharpie to add some highlight in her eyes.


The text banner is actually a zip strip from the Spirited collection from  Authentique paper, and I distressed the edges and pinched it slightly together as I glued it down so to make the text banner a little curved and add some dimention on my card. I did the same with the fence that is a die from La-la-land craft. Since this is a Halloween themed card I dressed up my little wizard girl with a cute little witch hat from a Cottage cut die. To finish of the card I added some pretty bling from Prima and Papirdesign to add some sparkle to my card. 


I usually don`t do a lot of Halloween cards, so I really enjoyed myself with this one, and I`m loving how it turned out. 


I`m entering this card to:

Simon Says: Text It | (simonsaysstampblog.com)

Besties International Challenge : October Challenge (bestieschallenge.blogspot.com)

Polkadoodles Cardmaking, Craft & Scrapbooking Challenge: Wk 42 - Card making & paper craft challenge - Anything Goes creative craft challenge at Polkadoodles

Crafty Catz: Crafty Catz Challenge #655 (craftycatzweeklychallenge.blogspot.com)

Challenge #572 - Hallowe'en or Hallowe'en Colours ~ The Paper Shelter


I hope you liked my card, and that you got inspired to create yourself a happy day crafting too.


Thank you for stopping by,

-Christine💮


Sunday, October 15, 2023

Explore the world of books

 Hi,

After a couple of weeks break and a nice family trip, I`m back with a double page mixed media art journal. I really missed letting my creativity flow so I had such a fun time creating this layout.

I`ve had this fantastic paper pad from Stamperia Vintage library waiting to be used again. I love the fantasy wibe with this paper - so inviting to let the imagination flow. 


For my background I used Distress ink in Tumbled glass, Salty ocean, Faded jeans and Black soot around the edges. This helps frame the image. Next I used Bold prints background stamp from Hero Arts to stamp randomly with black Archival ink. I stamped some small start in Hero arts white pigment ink, that was new to me and didn`t show up as much as I hoped, but it still adds interest to my background. I decided to add more stars with modeling paste and Stars Starry Nights stencil from Memory box. This stencil would give a very starry night on a background with a permenent medium like acrylic paint, but since I knew the modeling paste would pick up some color from the blue ink I knew my background wouldn`t turn out too busy. 


I used Ranger multimedia matt to glue down my images and also carefully brushed over my entire page with a dry brush sealing everything. This transforms the distress ink into a more vibrant color, making the sky appear more magical. I love how this turned out. Some white splashes and the sky was done.


I had to be creative and adjust the houses of books since the image only reached little over a page and I wanted it all the way across. So I found some books from the front page of the paper pack, and also images from regular books on different pages and then cutting some of the houses apart and adding windows and other elements from the main image to the regular books to make them look like houses too.


I had such fun creating this and kept on adding lots of little details to the book- houses on this layout. I used Faber-Castells Pitt artist big brush and dual marker to add more color depth and shades on the houses. I used black multiliner around the edges and also in between the houses and to each window and door to add more contrast and depth. I also added white gelpen to add some highlights to the details on the houses and books.


For my title I stamped Explore with Papirdesign  (PD2100365) and fussy cut the book roll that says "the world of books". To finish it off I added a gem to the moon. 

I love books and know how to appreciate a good fantasy story so this art journal is right up my ally.


I`m entering this to:


Wohoo!! I got a designer spotligt spot. Makes me so happy 😁


Thank you for stopping by, I hope you liked it and got inspired from this mixed media art journal to create yourself a happy day crafting too.


Hugs,

Christine 💮

Sunday, September 24, 2023

Nicks Tag and "Because of your smile" mixed media layout

 Hi,

Today I have two different projects to show you.

We are still playing along with the "Whats your favourit color" challenge, and while I was crafting and making my Tags with Lindys flat magicals that I shared on my IG channel earlier this week, my son joined in on the fun. He is 6 years old and I really love and enjoy these moments spending time together like this.

He wanted to join in the challenge with his tag so the first project I`m showing today is actually Nick`s. 

All by himself he applied Lindys flat magicals from the Words of wisdom set. These are so amazing! Next, he picked out the stamp he wanted to use, applied Versamark ink and stamped the floral from Tim Holtz on the tag. Since he made the tag for me- knowing red is my favourite color he the applied red embossing powder all over. I helped him heat up the embossing powder and put the ribbon on. I totally love how this turned out. More interesting then my own tags I must say. hehee. I would never have thought of using red embossing powder ower the colors on the tag- but it worked out perfectly. 


I was working on a mixed media layout using one of my favourit mother/son silhuette pictures I came across. I found this online and I`m not sure to whom the credit for this picture should go to. If you know please let me know so I can give properly credit for it. 


I kept the embellishment simple since the colors and all the splatter on the picture is quite demanding for the eye. I did use numbers for the dates my sons are born 19-5-8 on my layout. I glued on some wooden stars that I painted with gesso and I used a butterfly stamp on wellum and fussycut them gluing two and two tohether. The beautiful stencil is from Prima Finnabair Art deco wall using Graphite sand. It has that lovely sparkle to it. I also used Tim Holtz Bricks stencil and sprayed ower with some Lindys just to add a bit more soft color to my layout.


So Nick is entering his Tag to:

Thank you for stopping by, we hope we inspired you to create something too, maybe together with a family member or a friend.

-Christine💮

Tuesday, September 19, 2023

Fun technique on Christmas Tag

 Hi,

This years first Christmas project is a tag using a really cool and stunning technique. I used Tim Holtz  absolutely  stunning Holiday knit stencil with texture paste and Lindy`s embossing powder in red and dark green on top. Being a Norwegian this stencil with the traditional Norwegian knitting pattern is right up my alley, and I`ve knitted something similar. The stencil is from an older release but you can still get it.


See the shiny effect you get from the embossing powder on top of the texture paste. So cool.


I kept my embellisment simple just adding a pointsetta and some ribbon to my tag


I`m entering:

Simon Says: What’s Your Favorite Color? | (simonsaysstampblog.com)

I was the lucky winner:  


My favourite colours are red, orange and purple/burgundy. So my red goes from into the blues and follows the color wheel into the yellow color. So I picked red as my favorite color for this challenge. 


Thank you for stopping by, and I hope you got some inspiration to create yourself a happy day crafting too.


Hugs,

-Christine


Sunday, September 17, 2023

Romantic card

Hi,

Today I`m sharing one of the cards I made today. But first, Wohoo!!! over 10.000 views. Thank you for every click. This is so fun for me.💗

Okay, back to my card. I am so in love with how this turned out so I`m actually thinking about transfering it to a canvas so that I can put it up on the wall.

The papers are from Peon design and I dread the day I run out of them since they are the brand I bought the most papers from, but sadly there hasn`t been anything new for almost two years. But for now I still have some left. I distressed both my layers of papers around the edges going for a more feminine and romantic look and feel.

I made a flower wrath finding matching beautiful flowers in my stash from WOC. The butterfly is also something that I`ve had for years.


The picture doesn`t quite make this card justice, its soo pretty in real life.


I would like to enter this card to:

Simon Says: Take Flight | (simonsaysstampblog.com)

So happy and proud to get a designer spotlight:


SheepSki Designs Challenges: CHALLENGE #78 MAKE IT FEMININE (sheepski-designs-challenges.blogspot.com)

Crafty Catz: Anything goes optional with Dies (craftycatzweeklychallenge.blogspot.com)

Colorful Options: September 2023


Thank you so much for stopping by, I hope you liked this card and that you got inspired to create yourself a happy day crafting too.

Hugs,

-Christine💮

Sunday, September 10, 2023

Coffee with my Bestie

Hi,

Lets just start todays blogpost with a few seconds pause to think about the little things in life that gives us joy and makes life beautiful. For me meeting a friend enjoying a good cup of coffe is one of them. But a good cup of coffe is enjoyed well alone too😁

This adorable image is Fluffy Frannie from My Besties. I love how cute and versatile this image is. I colored her with my Copic markers and I`m so happy with how this card turned out. 


My sentiment is stamped using Archival ink in coffee and the sentiment translates into "Enjoy your day" and is from a local craft store. The leaves are die cuts using Marianne design and La La Land dies. The papers are from Maja design.


Copic colors that I`ve used:

Skin, listed in the order used: E000- E00- E21- E11- E04, R20
Hair: E43- E44- E47- E49
Outfit: R000- R00- R30- R32, B91- B93- B95- B97- B99, 0 blender
Hat: E30- E31- E33- E43
Flowers: Y11- Y15- Y38, E43- E44- E47- E49
R30- R35- R37- R39
R20- R22- R35
Y11, YG03-YG17- YG99
Stool: T1- T3, W3, C5
Grass: G94- G99


On the inside I stamped a little positive saying and I stamped it off center to leave some space for a personal message. It`s about how positive thinking breeds positive things in life. The norwegian stamp is from Papirdesign.


I`m entering this card to:


(2) Facebook Copic Marker Norge 

(2) Facebook Bikuben Hobby


Thank you for stopping by, have a nice day and enjoy life one cup at the time.
-Christine💮

Wednesday, September 6, 2023

Birthdaycard and fun surprise pop up ball giftbox

 Hi,

Today I`m back to share a gate fold card with bellyband and a matching gift box with surprise pop up balls that I made for my sons birthday. 


It was finally time to use these gorgeous papers from Wild Rose Studio, Man About Town that I have been hoarding for years. 


For my cards closure I made a belly band and popped up the scallup circle aswell as my sentiment on pop up dots to add some dimension and a little intrest. I added som Ranger stickles in Black diamond that have glitter in it. The birthday sentiment is in norwegian from Kort & Godt (M-180) On the inside a stamped an old sentiment that I love and find so beautiful. Its from Bildmålarne but I don`t think it`s available anymore.


I kept the gift box plane on the outside, just decorated it with the pattern paper. I used some black ribbon for my pull to open the box.


My son just moved to do a one year " Soccer in Europe" on a boarding school. He has always loved to play soccer and when I went to Karen Burnistons YT channel to see how to assemble my new pop up ball die, I got inspired to do a surprise football pop up balls gift box when I saw a snowball in a box assemble tutorial. This was so fun to gift and my son loved it and found it very cool.


Inside the box I made a little pocket where you can put a gift card, money or a tag to write a personal message. 


And here is a small clip from our birthday picknick outside his school opening the pop up ball gift box.


I`m entering this to :

Simon Says: Anything Goes | (simonsaysstampblog.com) - I was the lucky winner!     


Thank you so much for stopping by, I hope you liked it and that you got inspired to create yourself a happy day crafting too :)

-Christine💮