Sunday, June 2, 2024

Romantic card


 Hi, 

Today I’m back to share a card I made for a colleague’s daughter Confirmation. I also made the placements cards so I wanted this card to have the same look and feel with matching colors and embellishments. 

I just love how this card turned out and I was so happy to gift the card to my collueage as a little somthing as a thank you for ordering the placementcards from me!

I started applying modeling paste on the beautiful stencil from Finnabair keeping it diagonal. The card front was glued to a white card base leaving a small boarder. Then I added some beautiful lace appliqué. I cut out the die Triple Tear S4-490 from Spellbinders and popped it up by gluing thicker cardboard on the back. This beautiful horse topper is just perfect for any horse loving girl, and I got this clip art from NightingaleCraftery on Etsy and just printed it out at the desired size. You want to make sure you use a thicker copy paper when printing something like this. I use HP Color choice. 

I added some crochet flowers and opposites I made a large flower cluster in different sizes. I also added some pink seam binding ribbon and twine. Some flat back pearls to add my finishing thouches.

Here’s a peek at the placement cards, ready to print and glue on the names. 


I’m entering this card to:

Simon Says: Lots Of Texture | (simonsaysstampblog.com)

Simon Says: Anything Goes | (simonsaysstampblog.com)

Crafty Catz: Challenge #673 Plus redraw winner for #671 (craftycatzweeklychallenge.blogspot.com)

Classic Design Challenge Blog : Classic Design Challenge #05-2024 May/Jun - Anything Goes with Optional Twist: Masculine


Thank you so much for stopping by, I hope you liked it and that you got inspired to create yourself a happy day crafting too. 


Hugs,

-Christine💮


Saturday, June 1, 2024

Into the woods - Art Journal

 Hi, 

Today I’m sharing my latest art journal layout that I made with minimal products since I brought it with me as I was traveling last week. I already shared this on my IG so I could play along with the SSS art journal challenge that week but didn’t get a chance to publish it on my blog before now. 

The inspiration for this double page art journal was the phrase “and into the woods I go to lose my mind and find my soul”  The last couple of years I have enjoyed and used hiking as a way of self care, exercise and adventures with my dog and also with my sons. I love how quiet my mind goes looking out from a nice view when we reached the top. Norwegian nature sure is beautiful 🤩 

So back to the project, I worked in my stone paper journal from Stamperia and I first applied thin white gesso with a cheap bristle paint brush you typically get in a hardware store to get a streaky finish as my base. Next I applied Dylusion paint I blue and turquoise with baby wipes to get a very transparent color coat. Than I stamped randomly with a script background stamp around the pages. Since I was traveling by plane and couldn’t take lots of fluids with me I did this at home. I also printed out the flowers that are a free Digi paper from Maremis small art. 

On my trip a sat down enjoying and relaxing fuzzy cutting the flowers and gluing them down. Then I wrote the phrase and my page was done. I forgot my white gel pen and my black doodling pen at home but I really had fun crating this pages on the go and that’s the main point. I don’t typically use my hand writing on my pages, and the marker I used wasn’t the best, so I might have another go on a page using the same sentiment some day only because I love the phrase so much. 

Thank you for stopping by, I hope you got inspired to create yourself a happy day crafting too. 

Hugs, 

-Christine💮


Saturday, May 25, 2024

Too Cute 🐝

 Hi, 

It’s time for a new challenge over at the Polkadoodles challenge blog. This week I chose to color the Too Cute Bee digi stamp in a lovely pastel cloudy sky, and I think he just turned out super cute. 

For my card I used an edge die from an old La-La-Land craft club kit to give one of the card side a shaped edge down. I glued down a strip of paper on the inside of my card to make the edge pop out more. 


Copic colors I used:
Sky: 
Y000-00-11,
YR000-00, 
RV42
R000
V000-01
BV000-00 
BG000-11

Bee:
Y11-13-17
W5-7-9
R24


I had written down some of the colors for the sky previously. Unfortunately I just can’t find back to the video I watched that time to give credit to the one who came up with it. Anyway when coloring something like this you would look for the lightest or very light colors in the desired color family then add in a lower number light mid tone to get som depth and definition. 

I hope you liked my card and that you got inspired to create yourself a happy day crafting too. 

I’m entering this to:

(3) Facebook Copic Norge


Thank you for stopping by, 
Hugs,
-Christine 🌸

Saturday, May 11, 2024

Cool music gnome - card for boy/men

Hi everyone,

Today I`m sharing my latest Polkadoodles DT card, and this time it`s all about these masculine cards for man/boy. Being a mom of boys myself, I have three, those cards sure come in handy. 


For today`s card I used the cool Music Record Collector Gnome digital stamp. I think he`s so fun and I loved coloring him with my Copic markers. The pattern papers are from the Gnome for men Music Record printable pattern papers. If you are looking for something to use for a masculine card, you should check out the Gnome for men collection. There are so many fun and cool images both precolored and images ready to be colored with your favorite coloring medium along with matching papers and sentiments.


Copic colors used:

Skin: E04-11-21-00-000

Hat: BG49-13-000

Outfit: BG78-75-72-000

Beard: T3-1, W1-0

Headphone: W9-7-5-3-1 and E09, YR27-24

 Records: T9-7-3   


I`m entering this card to:

Crafty Catz: Crafty Catz Challenge #671 (craftycatzweeklychallenge.blogspot.com)

Challenge #595 - A Bit of a Giggle ~ The Paper Shelter

Facebook Copic Norge 


Thank you for stopping by, I hope you got some inspiration to create yourself a happy day crafting too.


Hugs,

Christine💮

Sunday, May 5, 2024

Theatre inspired confirmation card

 Hi everyone,

Today I`m sharing a confirmation card I made for a son of some friends confirmation last weekend. I`m so happy with how this card turned out.


I made the card into a double gate fold card, getting the inspiration from the theatre curtains opening up to begin the show. This young man loves the theatre and is also a talented actor at the local youth theatre, so that`s where I got the inspiration for the theme of the card.  


For the card front, I used an old paper from KaisercraftsOn Stage collection. The striped blue paper is a digital pattern paper from Polkadoodle Gnome music bundle. The pattern paper with blue stars is from Papirdesign. The edge star die from Tim Holtz are cut out in black glitter paper and I used the same die and just cut the stars into smaller pieces to decorate inside my card making sure to place them as to help guide the eyes across the card.


This sentiment is from Papirdesign and it says: "Some people make the world special just by being in it".


The pictures are printed to the desired size at home and the main one is placed in an Insta frame that I stamped and heat embossed with white embossing powder. The sentiment says: "You are amazing".


On the backside of the card, there is a nice space to write a personal note.

I love how this card turned out, and thank you for letting me post this card here on my blog with pictures in it. 


Thank you for stopping by.


Hugs,

-Christine💮


Saturday, April 27, 2024

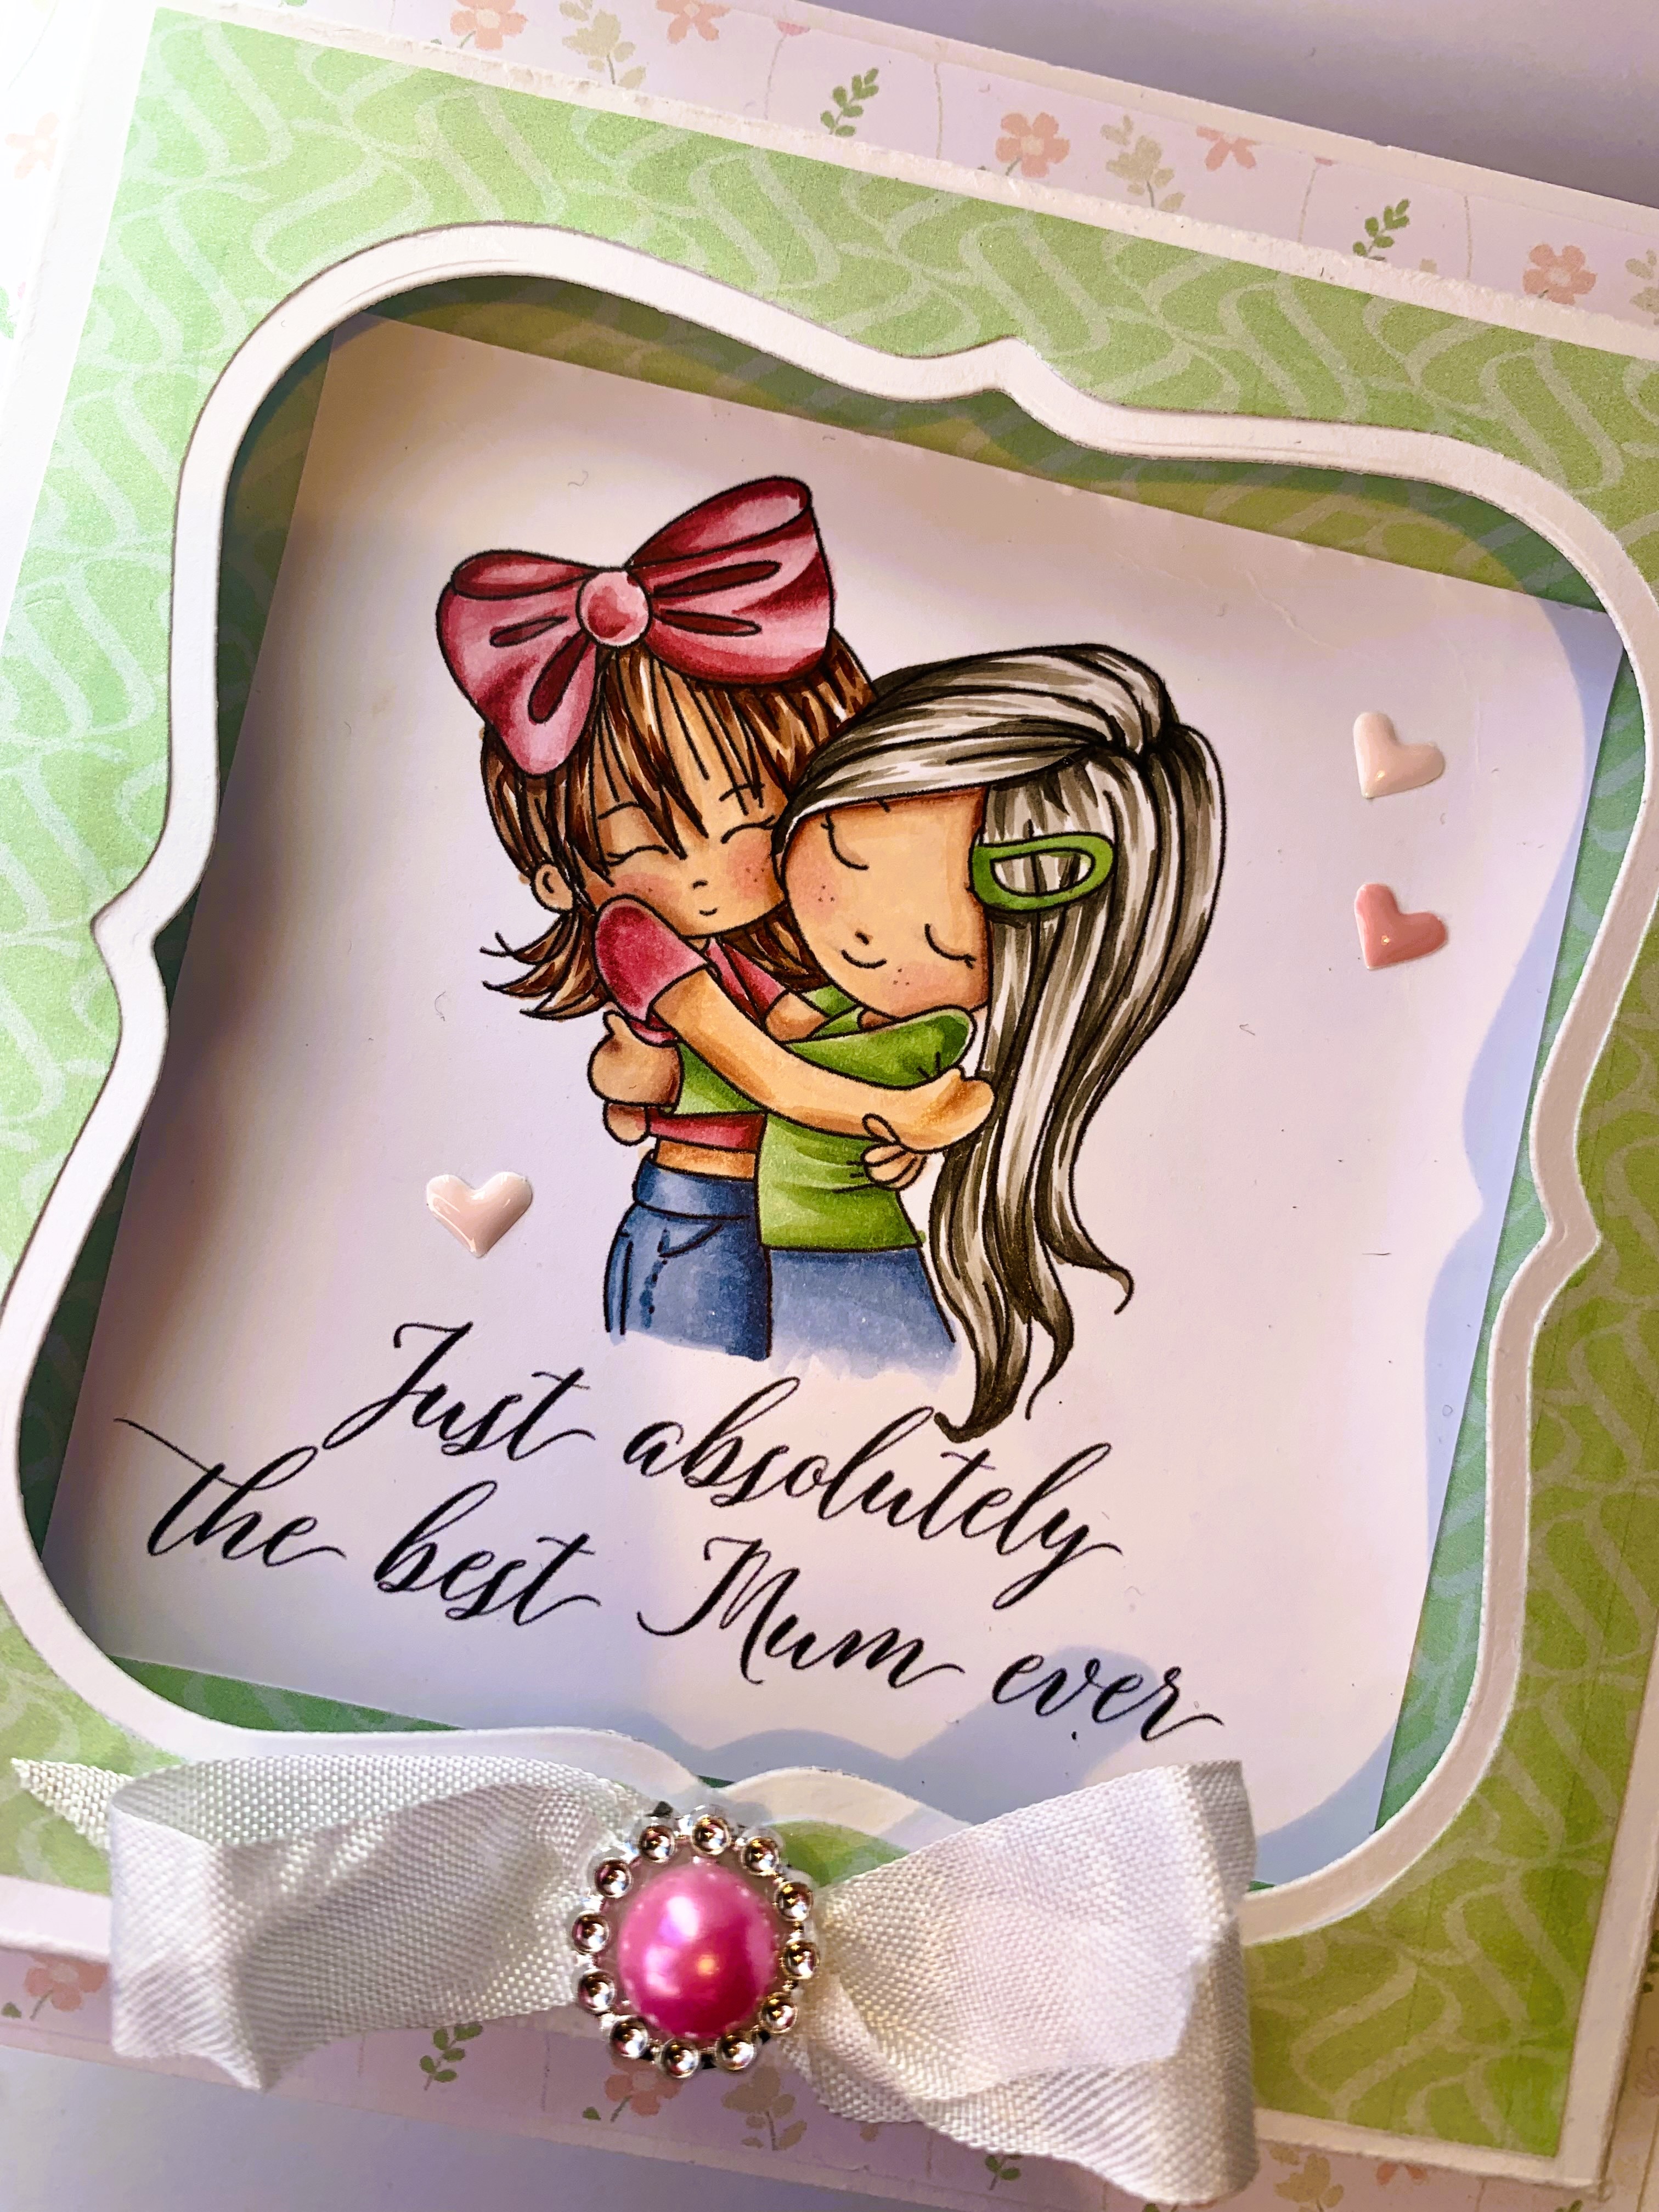
Absolutely the best mom ever

 Hi everyone,

Today I have some really exciting news to share. I`m so happy to have joined in on the Polkadoodles design team! I have been loving to play along on their challenge blog for a while, so why don`t you head over and  play along too?


For this weeks challenge I have made two cards. Mother`s Day is around the corner in many European contries and also in the USA, so here is some inspiration for you. For my first card I chose this cute Butterfly Tree Fairy and colored her up with my Copic markers. For my pattern paper I used three different sheets from the Alcea Hollyhock Flowers bundle. 

This was actually my first time using digital papers, and I must say I really like to use them. Not difficult at all. I printed them with my non fancy Canon Pixima printer on 120 gsm copy paper. I just used HP color choise 120 gsm that I got from my local bookstore. What I like is that you can scale your paper to size befor you print it or you can choose to scale the paper bigger than you actually need and the pattern on your paper will increase all depending on how big you want your pattern to be. I believe the paper is originally designed for 8*8 inch printing, but for most part I printed the paper to my desired layer size.

The sentiment is from Spring Flower-Mothers Day-Friend sentiments bundle.


Copic colors I used: 

Skin: E04-11-21-00-000, R20
Hair: E49-59-44-43
Outfit and wings: BG49-13-000
Shoes: W5-3-1
Butterflies: R05-22-30-11 Y00-11
BG49-13-000-0000 Y11-00
YR:02-000
Plant and Leaf: E49 G99-94 YG03
Pot: E43-44
Ground W5-3-1

To make this fun fold card I followed a tutorial from Wendy Lee on Youtube


My second card is a personal one, this is the card I made for my mom`s birthday earlier this month. I found this super cute and versatile digital stamp from Polkadoodles Winnie - Missed You a while ago and just had to have it. So I have been saving it`s first time use for this card.


The pattern papers I used are from the Pretty Winnie Daisy collection. The sentiment is from the same bundle as my last card, Spring Flower-Mothers Day-Friend sentiments.


Copic colors I used to color up my image: 

Skin: E04-13-11-21-00-000, R20
Hair: W7-5-3-1            
Outfit: R89-85-83-81                                                                                                  B99-97-95-93-91

Skin 2: E13-11-21-00-000 R22                                                             
Hair 2: E29-25-23-21                                                
Outfit 2: G46-43-21                                                                                                        B97- 95-93-91


I decided to make a box frame card to frame this lovely image and sentiment. Since this will be a hand out card, I didn`t worry about the 1/4 inch bulk of the frame. If mailed, I would sturdy the envelope with some thin cardboard or make a small box to go with the card.


I`m playing along:

simonsaysstampblog.com/mondaychallenge/ (Butterfly Tree Fairy card)

simonsaysstampblog.com/wednesdaychallenge/

Crafty Catz: Craftycatz Challenge #670 plus redraw for #669 (craftycatzweeklychallenge.blogspot.com)

Colorful Options: April 2024

Facebook Copic Norge


Thank you so much for stopping by. I hope you liked these cards and that you got inspired to create yourself a happy day crafting too.


Hugs,

-Christine💮

Thursday, April 11, 2024

Trust the magic of new beginnings - Double page layout

Hi,

Today I have a fun double page layout to share with you. Using Sir Vagabond in fantasy world from Stamperia as my focal point. I’ve been playing in my stone paper journal trying out a few new distress oxide sprays and stain sprays that I just bough and just having a lot of fun enjoying my “me - time “. 


The colors I used for my background are Tim Holtz Distress oxide spray old paper and speckled eggs in oxide and vintage photo in distress stain spray. I also went around the edges with vintage photo ink pad with a blending tool and again with black sooth but this time only at the very edge.
I felt so lucky finding the stamp I used to stamp randomly on my background in the outlet section called Not kollage-K from Inkido. I love the script and that the post stamp circle has Oslo-Norway written on it. I grew up there and my family lives there so it’s just one of these little details that makes me happy. Next I mixed Finnabair Art basic 3D gloss gel and a thicker black acrylic paint together using it over a stencil from Stamperias Create happiness line. I love the effect of the 3D clear gloss on the more muted oxide sprays background. The bigger contrast really gives an interesting look.  


All the pieces used in this layout are from the fantasy world 8*8 papers. I fuzzy cut and went around all the edges with black soot and a finger dabbed to only have black edges on my pieces. I used Ranger Multimedia mat to glue everything down and carefully went just over the images. The glue will react with the oxide sprays if you get it on your  background.


I used the saying “Just Trust the magic of new beginnings” as my sentiment this time because l believe that sometimes you just have to trust the process.  For my finishing touches I traced around every image and some parts of the images where I wanted to add more detail with a black pen. I also added some highlights with my Sakura white gel pen. Make sure your glue is completely dry before you do this step or the glue will ruin your pens and/or markers.

I hope you liked this art journal layout and that you got inspired to create yourself a happy day crafting too. I sure love my creative moments. 

I’m entering this to:


Thank you for stopping by.

Hugs,
-Christine💮


Sunday, April 7, 2024

No rain - no flowers

 Hi,

I`ve been enjoying myself with some Copic coloring again, and this time I colored up sweet Marci with an umbrella from La la land crafts. I`m eagerly waiting for spring to arrive, so I chose to color her up in fun bright colors.

My card is 6*6 inches and on the front of my card I scored around the edges 1/8 inch in from the inside of my card. That way you get your score line indent out on your card front. The sky pattern paper that I used is a leftover piece from the Ciao Bella summer breeze paper pad. I lightly went around the edges with Distress ink in blue jeans before I backed it with a medium bright blue cardstock. I used the two biggest circles in the Spellbinders nestabilities Triple Tear S4-490 that is a favourite at the moment adding foam dots for dimention. I also backed Marci up on foam dots to make her stand out even more.


I was so happy with how Marci turned out and the colors I used are:

Face: E000-00-04-11-21

Hair: E15-18-95-97

Outfit: B21-24-28-29

Umbrella: Y11-13-15

               YR00-12-15

               R20-22-24

               G00-02

               B21-24

               T1-3


This stamp is from an old club kit that also comes with some dies and sentiments to go with. I ran a raindrop border die through my machine and placed most of the raindrops back in place, securing them with a tape in order to use it as a tiny stencil. I decided to only go with a few drops and placed my DIY stencil just under the umbrella using a small spatula with the jummy Ranger distress Stickles in moon dust to add some sparkly raindrops. The "enjoy life" sentiment is from the same kit.                              To finish off my card I added some clear enamel drops from Simple and Basic, and I love how the fit the theme as they kind of look like little water drops.

I love how this card turned out and hope you like it too. 


I`m entering this to:

Simon Says: Whatever The Weather | (simonsaysstampblog.com)

Worldwide Crafters and Colorists Challenge: Worldwide Crafters and Colorists Challenge #15 (worldwidecrafterscoloristschallenge.blogspot.com)

fourseasons: April 2024 - Anything Goes SPRING Challenge (thefourseasonschallenge.blogspot.com)

(1) Facebook Copic Norge


Want to join me on Instagram? 

https://www.instagram.com/reel/C5dpSwZMvs_/?igsh=MjZ5cDVxbWNscXBo


Thank you so much for stopping by!

Hugs,

-Christine💮 


Wednesday, March 27, 2024

Happy easter card

 Hi friends,

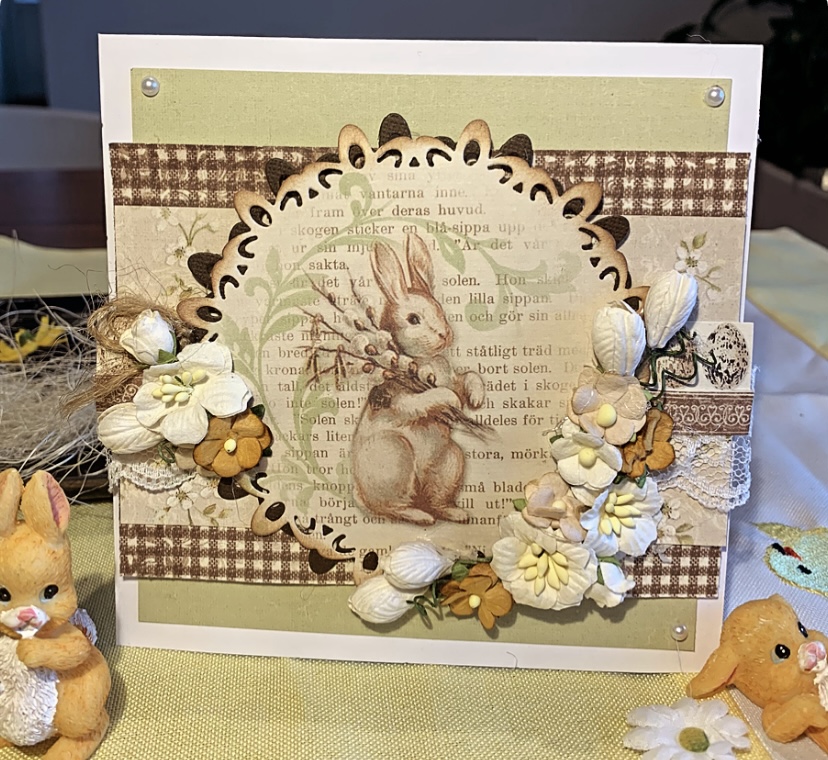
Today I`m back with a quick post to show you another easter card I made. I`m trying to stop hoarding and use up most of the beautiful easter papers I have left from the beautiful "Sagan om våren" collection from Pion design. Pion design was probably my favorite brand regarding patteren papers for cards. Back then all my cards had a Copic colored image and I love the softness and the colors of this brands paper. So sad they no longer exist to create their beautiful paper collections for us.


This card is 5.5*5.5 inches, a card size I like to create once in a while. The pattern papers are as mention above from an older collection from Pion design. I used Spellbinder nestabilities Triple tear (S4-490) to cut out the bunny and I also cut it out in dark brown and off set it to add some interest and to make the focal point pop more from the background. I used Distress ink in Gathered twigs around the edge of the die cut to frame it more. I added a lace and borders from the same collection and popped both the panel and the frame up on foam dots for added dimension. 


I added some spring flowers around the frame, and some flat back pearls to the corners to finish off the card.


I`m entering this card to:

Simon Says: Easter/Spring | (simonsaysstampblog.com)

Crafty Catz: Crafty Catz Challenge #668 (craftycatzweeklychallenge.blogspot.com)

Polkadoodles Cardmaking, Craft & Scrapbooking Challenge: Wk 12 - Card making & paper craft challenge - Anything Goes creative craft challenge at Polkadoodles


A quick and easy easter card. I hope you like it, and that you got inspired to create yourself a happy day crafting too.


Thank you for stopping by.


Hugs,

-Christine 💮


Monday, March 18, 2024

Easter card - Tilda with bunny

 Hi,

I`ve had a couple of stamped easter images ready for coloring in my Copic suitcase literally for years. And today was the day I finally got around to sit down and enjoy myself coloring up this very old but cute and loved Tilda stamp from Magnolia. I also went stash diving on the papers, ending up with some lovely papers from Pion design that sadly are closed down. There are so many cute stamps to color up and tons of pretty paper so I hope this still can inspire you to get out your coloring medium and play around and create something beautiful, or just enjoy the process of coloring.

I inked up all the edges of my papers with Distress ink in Vintage photo, going in a bit more heavy around my colored image. I used a circle die that I only cut partially around my image before fussy cutting the rest around her hat. I placed her on a napkin and popped herup on foam tape. I also used foam dots to add dimension on my panels. I used a lace and a strip from the same paper collection to add some interest under my image. Then I glued on some skeleton leaves in green, added some rolled flowers and a little wooden bunny from Wycinanka. The cute little yellow duck is a button from Buttons galore Spring pack that I got as a gift in my latest order from Bikuben so I thought it was fun to include that on my card.


Today I wanted to challenge myself and try a different approach when coloring my image. I started putting down a thin base layer with my lightest color in my color blend. Then moving on to my darkest mid tone or the darkest color in my color blend and then work my way down again. Going back to deepen my shadows and smoothing my blending with a second coat. Usually, I color dark to light, mapping out my shadows with my lightest or a lighter mid tone color before going with my darkest marker coloring dark to light. When coloring hair, I often go with my second darkest marker first since I can be a bit heavy with my darker strokes. This gives the darker hair color version of the color blend. And that`s totally fine, except when I want to enhance the lighter colors and only keep my darker markers for the deepest shades.


I`m playing along with Simon Says Stamp challenges this week, and the theme is a bit of green, so I colored accordingly. Colorful option also has green as a theme.

Copic colores used:

Skin: E000-00-04-11-21, R20

Hair: E43-50-53-57

Outfit: G000-21-24-28 and B91-93-95-97

Shoe: E41-42-44-47

Hat: E30-31-33 and G000-21-24-28

Bunny: E41-42-44-97 and T1-3


I`m entering this card:

Simon Says: A Bit O’ Green | (simonsaysstampblog.com)

Simon Says: A Bit O’ Green | (simonsaysstampblog.com)

Polkadoodles Cardmaking, Craft & Scrapbooking Challenge: Wk 11 - Card making & paper craft challenge - Anything Goes creative craft challenge at Polkadoodles

(4) Facebook Copic Marker Norge 

Crafty Catz: Crafty catz # 667 Anything Goes (craftycatzweeklychallenge.blogspot.com)

Colorful Options: March 2024


Thank you so much for stopping by, I hope you liked it and that you got inspired to create yourself a happy day crafting too. 

Hugs,

-Christine💮


Sunday, March 3, 2024

Shine - art journal layout

Hi everyone,

I`ve  had so much fun creating this double page art journal layout where I`m combining two of my favourite things, Copic coloring and art journaling. I totally fell in love with the fantasy moon digistamp from Polkadoodles and if you like to grab yourself a copy it`s on great sale right now. 

I`m working in my A5 mixed media stone paper journal from Stamperia. I started out with distress acrylic paint in tumbled glass, stormy sky, blueprint sketch and vilted violet. The paint is applied directly on the paper then using horizontal strokes with a dry brush to randomly distribute the paint leaving streaks in the different colors visible. To darken the overall look and feel, and also to frame my layout I used black paint that I applied with a sponge dabber dabbing around the edges on my page.


For my focal point printed out the digistamp in the desired size twice to get enough flowers and leaves for both pages. Then I started coloring the moon and worked on getting some visual texture. I both sprinkled colorless blender on it and dotting the colors in the shaded areas making sure not to over do it as I didn`t want the moon to be too dotted looking. Next, I colored all the flowers and leaves also on the second page before fussy cutting everything. When I have lots of little details to cut I just take my time and enjoy the process doing the best I can. It really doesn`t matter for your end result if you leave out some small parts. 


Copic colors I used:

Moon: Y00-10-13-15, YR000-00, Colorless blender refill drops 

Flowers: RV10-63-66-69

             V15-17, BV02

             R20-22-35-37

             B24-60-63 (Y10?)

Flower center: E09, Y13-15-17

Leaves: BG72-73-93

            G21-43-46-94

            G21-94, YG17

Shadows: T7


To add some sparkle and more interest on my page I applied Distress stickles with a spatula on random parts of the stars starry night stencil from Memory box. I just love this glitter stickles. In real life, it has this clear sparckly finish that adds the perfect amount of sparkle. Not too much. It depends on how the light catches it and on some of the photos it looks way more silver than it actually is.


For my sentiment "Just like the moon, you don`t have to be whole to shine" I printed out strips on my laptop and the words moon and shine are cut out using an older Tim Holtz bigz die called block talk lowercase from Sizzix. I really like this saying. It`s something well worth remembering.

I added some highlights with my Sakura white gel pen and also doodled in some elements with my black Pilot G TEC C4 pen. This is my favorite doodling pen.


I like to enter this to:

Simon Says: Anything Goes | (simonsaysstampblog.com)

Polkadoodles Cardmaking, Craft & Scrapbooking Challenge: Wk 9 - Card making & paper craft challenge - Anything Goes creative craft challenge at Polkadoodles

Wohooo!! I made TOP 3!

Polkadoodles Cardmaking, Craft & Scrapbooking Challenge: Wk 11 - Card making & paper craft challenge - Anything Goes creative craft challenge at Polkadoodles


Creative Artiste Mixed Media Challenge Blog: Welcome to Creative Artiste Challenge #102

Crafty Catz (craftycatzweeklychallenge.blogspot.com)

(4) Facebook COPIC MARKER NORGE

Thank you so much for stopping by, I hope you liked my art journal layout and that you got inspired to create yourself a happy day crafting too.


Hugs,

-Christine💮