Wednesday, March 27, 2024

Happy easter card

 Hi friends,

Today I`m back with a quick post to show you another easter card I made. I`m trying to stop hoarding and use up most of the beautiful easter papers I have left from the beautiful "Sagan om våren" collection from Pion design. Pion design was probably my favorite brand regarding patteren papers for cards. Back then all my cards had a Copic colored image and I love the softness and the colors of this brands paper. So sad they no longer exist to create their beautiful paper collections for us.


This card is 5.5*5.5 inches, a card size I like to create once in a while. The pattern papers are as mention above from an older collection from Pion design. I used Spellbinder nestabilities Triple tear (S4-490) to cut out the bunny and I also cut it out in dark brown and off set it to add some interest and to make the focal point pop more from the background. I used Distress ink in Gathered twigs around the edge of the die cut to frame it more. I added a lace and borders from the same collection and popped both the panel and the frame up on foam dots for added dimension. 


I added some spring flowers around the frame, and some flat back pearls to the corners to finish off the card.


I`m entering this card to:

Simon Says: Easter/Spring | (simonsaysstampblog.com)

Crafty Catz: Crafty Catz Challenge #668 (craftycatzweeklychallenge.blogspot.com)

Polkadoodles Cardmaking, Craft & Scrapbooking Challenge: Wk 12 - Card making & paper craft challenge - Anything Goes creative craft challenge at Polkadoodles


A quick and easy easter card. I hope you like it, and that you got inspired to create yourself a happy day crafting too.


Thank you for stopping by.


Hugs,

-Christine 💮


Monday, March 18, 2024

Easter card - Tilda with bunny

 Hi,

I`ve had a couple of stamped easter images ready for coloring in my Copic suitcase literally for years. And today was the day I finally got around to sit down and enjoy myself coloring up this very old but cute and loved Tilda stamp from Magnolia. I also went stash diving on the papers, ending up with some lovely papers from Pion design that sadly are closed down. There are so many cute stamps to color up and tons of pretty paper so I hope this still can inspire you to get out your coloring medium and play around and create something beautiful, or just enjoy the process of coloring.

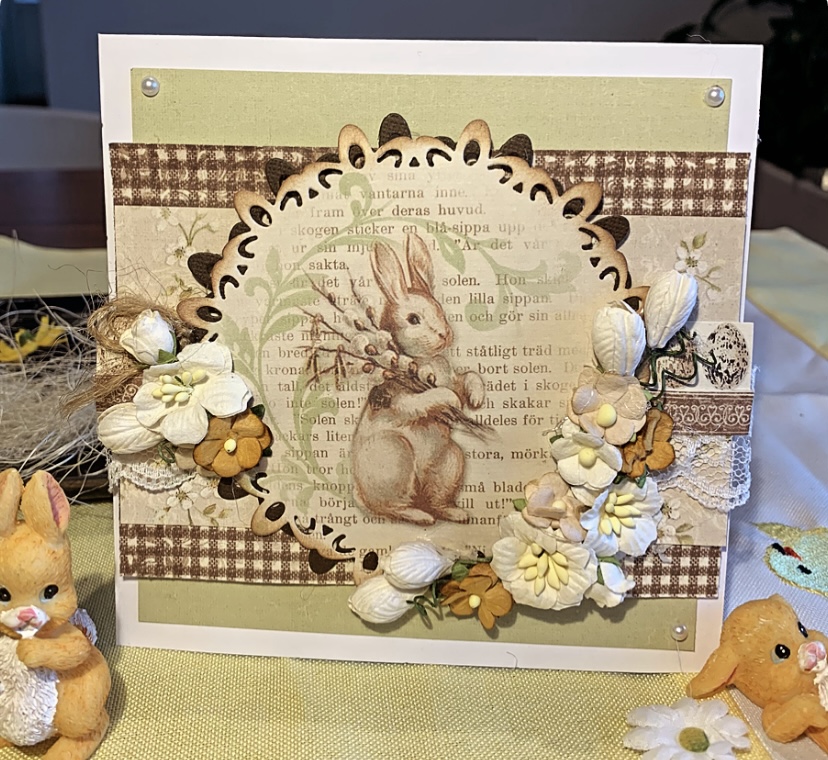
I inked up all the edges of my papers with Distress ink in Vintage photo, going in a bit more heavy around my colored image. I used a circle die that I only cut partially around my image before fussy cutting the rest around her hat. I placed her on a napkin and popped herup on foam tape. I also used foam dots to add dimension on my panels. I used a lace and a strip from the same paper collection to add some interest under my image. Then I glued on some skeleton leaves in green, added some rolled flowers and a little wooden bunny from Wycinanka. The cute little yellow duck is a button from Buttons galore Spring pack that I got as a gift in my latest order from Bikuben so I thought it was fun to include that on my card.


Today I wanted to challenge myself and try a different approach when coloring my image. I started putting down a thin base layer with my lightest color in my color blend. Then moving on to my darkest mid tone or the darkest color in my color blend and then work my way down again. Going back to deepen my shadows and smoothing my blending with a second coat. Usually, I color dark to light, mapping out my shadows with my lightest or a lighter mid tone color before going with my darkest marker coloring dark to light. When coloring hair, I often go with my second darkest marker first since I can be a bit heavy with my darker strokes. This gives the darker hair color version of the color blend. And that`s totally fine, except when I want to enhance the lighter colors and only keep my darker markers for the deepest shades.


I`m playing along with Simon Says Stamp challenges this week, and the theme is a bit of green, so I colored accordingly. Colorful option also has green as a theme.

Copic colores used:

Skin: E000-00-04-11-21, R20

Hair: E43-50-53-57

Outfit: G000-21-24-28 and B91-93-95-97

Shoe: E41-42-44-47

Hat: E30-31-33 and G000-21-24-28

Bunny: E41-42-44-97 and T1-3


I`m entering this card:

Simon Says: A Bit O’ Green | (simonsaysstampblog.com)

Simon Says: A Bit O’ Green | (simonsaysstampblog.com)

Polkadoodles Cardmaking, Craft & Scrapbooking Challenge: Wk 11 - Card making & paper craft challenge - Anything Goes creative craft challenge at Polkadoodles

(4) Facebook Copic Marker Norge 

Crafty Catz: Crafty catz # 667 Anything Goes (craftycatzweeklychallenge.blogspot.com)

Colorful Options: March 2024


Thank you so much for stopping by, I hope you liked it and that you got inspired to create yourself a happy day crafting too. 

Hugs,

-Christine💮


Sunday, March 3, 2024

Shine - art journal layout

Hi everyone,

I`ve  had so much fun creating this double page art journal layout where I`m combining two of my favourite things, Copic coloring and art journaling. I totally fell in love with the fantasy moon digistamp from Polkadoodles and if you like to grab yourself a copy it`s on great sale right now. 

I`m working in my A5 mixed media stone paper journal from Stamperia. I started out with distress acrylic paint in tumbled glass, stormy sky, blueprint sketch and vilted violet. The paint is applied directly on the paper then using horizontal strokes with a dry brush to randomly distribute the paint leaving streaks in the different colors visible. To darken the overall look and feel, and also to frame my layout I used black paint that I applied with a sponge dabber dabbing around the edges on my page.


For my focal point printed out the digistamp in the desired size twice to get enough flowers and leaves for both pages. Then I started coloring the moon and worked on getting some visual texture. I both sprinkled colorless blender on it and dotting the colors in the shaded areas making sure not to over do it as I didn`t want the moon to be too dotted looking. Next, I colored all the flowers and leaves also on the second page before fussy cutting everything. When I have lots of little details to cut I just take my time and enjoy the process doing the best I can. It really doesn`t matter for your end result if you leave out some small parts. 


Copic colors I used:

Moon: Y00-10-13-15, YR000-00, Colorless blender refill drops 

Flowers: RV10-63-66-69

             V15-17, BV02

             R20-22-35-37

             B24-60-63 (Y10?)

Flower center: E09, Y13-15-17

Leaves: BG72-73-93

            G21-43-46-94

            G21-94, YG17

Shadows: T7


To add some sparkle and more interest on my page I applied Distress stickles with a spatula on random parts of the stars starry night stencil from Memory box. I just love this glitter stickles. In real life, it has this clear sparckly finish that adds the perfect amount of sparkle. Not too much. It depends on how the light catches it and on some of the photos it looks way more silver than it actually is.


For my sentiment "Just like the moon, you don`t have to be whole to shine" I printed out strips on my laptop and the words moon and shine are cut out using an older Tim Holtz bigz die called block talk lowercase from Sizzix. I really like this saying. It`s something well worth remembering.

I added some highlights with my Sakura white gel pen and also doodled in some elements with my black Pilot G TEC C4 pen. This is my favorite doodling pen.


I like to enter this to:

Simon Says: Anything Goes | (simonsaysstampblog.com)

Polkadoodles Cardmaking, Craft & Scrapbooking Challenge: Wk 9 - Card making & paper craft challenge - Anything Goes creative craft challenge at Polkadoodles

Wohooo!! I made TOP 3!

Polkadoodles Cardmaking, Craft & Scrapbooking Challenge: Wk 11 - Card making & paper craft challenge - Anything Goes creative craft challenge at Polkadoodles


Creative Artiste Mixed Media Challenge Blog: Welcome to Creative Artiste Challenge #102

Crafty Catz (craftycatzweeklychallenge.blogspot.com)

(4) Facebook COPIC MARKER NORGE

Thank you so much for stopping by, I hope you liked my art journal layout and that you got inspired to create yourself a happy day crafting too.


Hugs,

-Christine💮