Saturday, May 27, 2023

Easy, pretty watercolor flowers - Card

 Hi, 

Today I`m sharing three different cards with easy beginner friendly jet very pretty watercolor painted flowers. I have used two different techniques for my flowers, both easy to recreate if you want to have a go on them aswell. 

My first card is a slimline card.


I painted my flowers in different shades of blue and blueish purple. I placed a drop of paint and used a round brush dipped in water and just wiggled it out to form a petal. You can find a great tutorial for loose watercolor florals here (40) the easiest flowers i've ever painted! - YouTube


For this card I decided to add a little bling to my flowers to dress up my card. So after my flowers where dry I added  stickles in Star dust, my favourit for adding sparkles. For my flowercenter I used liquid pearls in white opal. For my sentiment "Klem" I cut out the shadow in white cardstock and the script in black cardstock. 


And here is another look at the finished card. 


For my second card I used different colors and a different card shape. I love the yellow and yellow-green colors against the green cardstock. 


This time I used black cardstock for the shadow and white for the script on my sentiment. 
For my flowercenter I used liquid pearls in copper.


On my third card my flowers are painted different. This time I placed some dots with color in a circle and using a wet flat brush to form each petal. I got inspired to try this technique after watching a reel on IG on a flower like this from Marimi small arts. Again I used different blues or purple-blueish colors for my flowers. This time my flowercenters are drawn in with a black pen. My sentiment is cut from the same die as on my last card, just reversed my colors.


Let me know down in the comments which one is your favourite.

I`m entering each card in 


I hope you liked todays cards and that you got inspired to create yourself a happy day crafting.

Thank you for stopping by,

-Christine


Sunday, May 21, 2023

Forever by my side - Art Journal

Hi everyone,

I`m so excited to share this art journal page with you today. I`m totally in love with how this one turned out, even though it might be on the darker side for some of you. For my focal point I used an image I colored up myself, combining two of my favorit things, Copic coloring and art journaling. I just love the outcome and you will see me doing this more often in the future.

I`m sorry for the poor photo quality. The bright daylight wased out the colors a bit, I will try to take better pictures when I have time during this week. Hope you still like it :)  


The beautiful image is actually cut out from a coloring book I have from Mitzi-Sato Wiuff called Midnight Gardens. She is the artist behind Aurora Wings stamp. I don`t think the coloring book is still available anymore, but there are many stunning digital stamps on her Etzy shop. 


I used quite a lot of markers on her dress and I may have used hintes of markers not mention here as I was looking for the color combination I wanted, but here are the once I mainly used:

Skin: E50-51-11 - BV20 - R20
Gold: Y15- YR24-27-E15
Red: R20-22-24-29- Grey T7 for deeper shading 
Orange dress: YR000-00-31-38-16
Flowers: RV00-55-66-69 - R22
Green: YG03-17
Skull: Grey C:0-1-3-5


For my background I used some blue shaded distressinks on a plastic sheet, spritsing it with water and then dabbing the plastic sheet on y pages. Then I used a background stamp from Stamperias Create happiness stamps and stamped randomly with Tumbled glass and Faded Jeans. Then I used black Archival ink for the text stamp and the cute flowers I stamped along the bottom of my pages, also from the same collection. I decided to color my flowers with gold acrylic paint to get a more ancient Japan feel to my pages. As a finishing thouch I splattered with gold acrylic paint, used my white Sakura gelpen for some highlights and my black Copic multiliner for some black details and I also wrote my text for hand since I was crafting at the cabin and didn`t have anything else to use for my quote. 


I love the contrast of the beautiful lady with her stunning kimono holding a skull in her hand as she looks back at you. I think the words " Always by my side" fits the image well as she walks holding the skull, but I guess it also has to do with the date as today was my wedding day. This summer it will be 8 years since ha suddenly past away and he would also have had his birthday the 23th. So I guess you could say that these days every year he is in my thoughts more often.


I`m entering this in :Simon Says: Art Journal | (simonsaysstampblog.com) (second entry)

I hope you like todays art journal, and that you got inspired to create yourself a happy day crafting.

-Christine


Thursday, May 18, 2023

17th of May - Art Journal

 Hi,

Today I`m back with a quick post to share my 17th of May inspired art journal layout.

We had a great celebration yesterday spending time with our family. My youngest son participated in the parade and we eat lots of cake and ice cream.

For my background I used several fun techniques like gluing down paperpices with modpodge, painting, stenciling and stamping. For my flag I painted white cardstock with some red Dylusion paint before cutting out the flag like it was blowing in the wind. The white is cut out from Bazzil Bling Diamond cardstock and the blue is cut out on white cardstock again but this time I used a blue Copic marker, B18,  to color it up before gluing the pices together and ontop of the red flagbase. For my flagpole I used a small wooden stick that I peeled in two and then I inked it up with Vintage Photo and Gathered Twigs distress inks.


The green leaves are diecuts left from a previous project also colored with Dylusion paints and the strawberries are cut out from the napkins we used yesterday, but they didn`t quite turn out like I hoped because of all the dimension and colors underneath. Oh well... :) 


I stamped the words Hipp Hurray in Norwegian before I added some splatters, some white Sharpie pen highlights and then I finished it off with black and white marker around the edges to frame the pages.


I`m super excited about this weeks theme over at Simon Says Stamp monday challenge - Art Journal, and I`m happy to enter this 17th of May Art Journal layout to Simon Says: Art Journal | (simonsaysstampblog.com) 

Hope you got inspired to create yourself a happy day crafting and thank you for stopping by.
-Christine


Monday, May 15, 2023

17th of May Rosette - Lollipop card

 Hi,

"Hipp Hipp Hurray!!" I`m busy with the last preperations for THE 17TH OF MAY! Norways national day. Children’s parades, marching bands, traditional costumes, and ice cream. Lots of ice cream. Norway's Constitution Day is quite a party!

Want to know more? Check out the link to visit Norway Norway’s national day: 17th of May | The Norwegian Constitution Day (visitnorway.com)

(Photo borrowed from web)


So today I decided to make a lollipop card. They are so fun and easy to make and I havn`t made one in years. I just love the playfulness they have.


I cut out a strip of red cardstock measuring 2 1/4  by 12 inch and another strip measuring 2 1/4 by 6 inch. Then I used a scallop edge punch from EK Suksess one one side of the strip before scoring on each mountain-valley approxemately every 1/4 of an inch before folding it and gluing it down on a 2 inch sircle. There are lots of tutorials on lollipop cards out on Youtube. I wanted my white to be really white so i used Bazzil Bling diamond and a Spellbinder dies to cut out my circle. Another popular option is to use paper doilies for this, but I wanted a more crisp look for this project. For my blue I used the same scallop punch on a 1,5 inch by 12 inch strip. For my senter I used a circle in the same white bling cardstock. 


I decorated my card with a few flowers and stamped the word "gratulerer" which means congratulation.


For the stick I glued on a paper straw and some white seambinding tied as a simple bow.


I wish everyone who celebrates this day in Norway or around the world a great celebration and and HIPP HIPP HURRAY for 17th of May!

I hope you liked my rosette - lollipop card and that you got inspired.

-Christine

Sunday, May 14, 2023

A card Inspired by Music

 Hi,

Today I`m back with a quick card inspired by the theme of this weeks monday challenge over at the Simon Says Stamp blog- Inspired by Music.

I used some music themed papers and ephemera that I`ve had for years from the On Stage Art collection by Kaisercraft. I matted the pattern paper on white cardstock and popped the panels on foam tape for added demension to my card.


I usually add more to my cards so I`m actually way off my comfort zone if you look at my cards from my earliest posts here on my blog. But for this card it felt right to keep it simple since the pattern papers are quite busy.


And since the inspiration for this card was Inspired by Music I`m entering this to:

Simon Says: Inspired By Music | (simonsaysstampblog.com)


 I hope you like it and that you too got inspired to create yourself a happy day crafting.

-Christine

Monday, May 8, 2023

Art Journal - Bee happy

 Hi, 

Today the sun is shining, and you really trust the feeling that spring is finally here. It feels like today is going to be a good day and what better way to start it than to share my new art journal layout with you. I`m totally in love with how this one turned out.


While I picked up some groceries on Saturday I came across these adorable napkins that I just got so many ideas on how to use in my crafting. On one part you got these bigger bees and on the other side they where smaller and lots more all on top of these pale yellow polkadots.


Cute.. But now back to my art journal pages. I skipped one page and started to create my background with Distress inks in Tumbled glass, Peacock feathers and Faded jeans. I spritzed on a good amout of water letting the ink do its thing before letting it dry completely. Splatters in Walnut stain and white gesso with my fan brush. I put my crafting mat under the page I wanted to cut in as not to ruin the other pages in my book, and used some round Spellbinder dies as my guide as I carfully cut out the three circles with my craft knife. Then I cut out the scallop borders with my X-cut nesting dies in brown cardstock darkening the edges with Walnut stain. The circles dont have a perfect match and since I didn`t want two offset circles on the same page I cheated and ripped the smallest one and adjusted it to fit hiding the overlap under my bee. 


Fore my page behind I peeled off the back layers of my napkin and placed it the way I wanted the bees to show up peeking through the circles and glued it down and sealed it well using mat modpodge. I also did the same with the bigger bees on a pice of cardstock before I fussycut them when they where dried  completely. Before I glued them down I traced all around the edges with a black marker as not to leave a white border.


I went ower the wing with the lightest blue Copic markers to tye everything together using the colors B0000-B000-B01. It`s extremly important that the modpoge is completely dry before you color ontop of it since the glue will destroy your marker nib if still wet.


I darkened the edges of the papers with Faded jeans and Walnut stain and cut out the letters for my motivational words on black card stock. The word happy is from the Tim Holtz booklet. I used my Sakura gel pen and a black pen to add some finishing touches.


I just love the outcome of this and how fun and cute it is with the bees from the napkin peeking through from the pages underneath. 


I`d like to enter this in:

Colorful Options: May 2023 Blue - second entry

Simon Says: Paint It | (simonsaysstampblog.com) - second entry

Simon Says: No Patterned Paper | (simonsaysstampblog.com)


Thank you for stopping by, I hope you liked it and that you got inspired to create yourself a happy day crafting.

- Christine


Friday, May 5, 2023

Fun and easy shaker card

 Hi,

My son is going to a birthday party to a friend tomorrow so I decided to make a fun, easy shaker card. Now being a boys mom I realized that I really don`t have that much paper fitting to a 7 year old girl, but then I found the old beautiful Enchanted Garden papers from Kaisercraft and I think they fit perfect for a girl that age. 


I cut out two ballons using dies from an old  Lalaland club kit and cut out the ballon threads in glossy silver cardstock to add som bling and interest to the card.


I glued on a pice of acetate sheet behind the cut out balloon shapes before I popped on foamtape around each balloon cut out taking care not to leave any gaps. I also used foam tape around the whole panel to even out the card and glued it on to my cardbase. Then I filled my balloon shaped windows with some silver sequence, a bit of shaved ice and some tiny pink pearls. A pink flower to gather my balloon threads and the card is done.


For my inside I kept it clean and simple, just using a part of the paper to write in a personal birthday greeting.


Thank you for stopping by, and I hope you got inspired to create yourself a happy day crafting.

-Christine

Tuesday, May 2, 2023

Art Journal - Blessed

 Hi,

Today I`m back with a colorful double page art journal layout that has a very personal meaning to me.

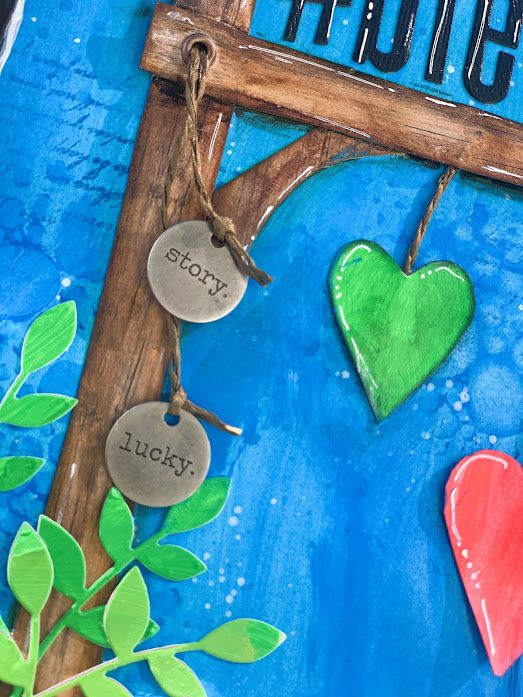
This layout represents my children and how blessed I feel having them in my life. The three hearts hangind from the sign pole are my boys and the little pink heart is my little angel and my first pregnancy where I went into labour to early. When I got pregnant again I praid for a boy and now I`m blessed with tree. I wanted this layout to be bright, happy and colorful because this is my story and I feel so lucky to be blessed as a boys mom of three.

To get the fun and happy colorful page I wanted I used Dylusions paints both on my background and on my hearts and leafs. For my background I applyed the color with a baby-wipe and then dabbed on the same color using a Tim Holz stencil. I then stamped around randomly with a script stamp using blue distress ink. For my heart and leafs I colored up some paper in the colors I wanted and used my scissors to cut out the hearts and used Lorelai Leaf die from Poppystamps for the leafs.


For the sign pole I sketched out the shape I was going for with my pencil on some wood texture papers from Simple Stories. I used an eyelet to put them together and threaded it with some twine. On the ends I tied in some Tim Holtz typed tokens with the words "Story" and "Lucky" and I think they where just perfect here.


I also used some twine to hang my three hearts from the sign, and I think it really adds some interest 
to my page.


This is actually the first page in my Dylusions art jounal that I saved to do this personal layout on, and I`m really happy with how this turned out. Hope you like it as much as I do.


I`m entering this in:

Simon Says: Anything Goes | (simonsaysstampblog.com)

Simon Says: Paint It | (simonsaysstampblog.com)

Colorful Options: May 2023


Thank you for stopping by and I hope you got inspired to create yourself a happy day crafting.

-Christine